
Google Sheets is a powerful tool for data analysis that contains numerous functions intended to simplify number crunching and data analysis. One such function is the IMAGE function, which allows users to insert images into their spreadsheets. In this blog post, we’ll take a closer look at the IMAGE function in Google Sheets, its benefits, how to use it, and some tips and tricks to keep in mind.
Introduction
The IMAGE function in Google Sheets is a way to insert an image into a cell in a spreadsheet. This function works by taking the URL of an image and displaying it as a picture within the cell. The function can be used to display a variety of images including logos, diagrams, charts, and even photographs.
Benefits of using the IMAGE function in Google Sheets
Before we dive into how to use the IMAGE function, let’s take a moment and look at some of the benefits of using this function
- Improved Data Presentation: Adding images to your data in Google Sheets can greatly improve the presentation of your information. Images can help to highlight key data points, making it easier for others to understand the information.
- Customizable Images: The IMAGE function allows for customizable images to be inserted into a cell, meaning that the image can be changed based on data entered into the spreadsheet. This makes it possible to create dynamic visuals that change based on the data in the sheet.
- Increased Engagement: By adding images to your spreadsheet data, you can increase engagement and interest in the information being presented. This can be especially useful for presentations or reports.
- Flexibility: The IMAGE function in Google Sheets is incredibly flexible, allowing you to add images to any cell within a sheet. This makes it easy to incorporate images into your data in a way that is both useful and aesthetically pleasing.
How to use the IMAGE function in Google Sheets
Using the IMAGE function in Google Sheets is relatively simple. To begin, you’ll need to have the URL for the image that you want to display in your spreadsheet. Once you have the URL, follow these steps to insert the image into your sheet:
- Open your Google Sheet and select the cell where you want to insert the image.
- Type the following formula into the cell: =IMAGE(“URL”, [mode], [height], [width]).
- Replace “URL” with the URL of the image you want to insert. Be sure to include the quotation marks around the URL.
- [Optional] Add additional arguments to the formula to customize the size and display mode of the image.
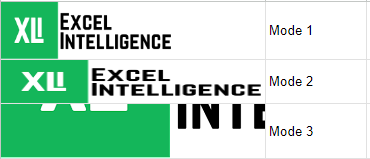
- [mode] argument determines how the image should be scaled and positioned in the cell. The mode can be set to “1” (fit), “2” (fill), or “3” (stretch). The default value is “1”.
- In mode “1”, the image proportions will remain intact as the image size changes depending on the width and height of the cell.
- In mode “2”, the image will be stretched to fit the cell, disregarding image height and width proportions
- In mode “3”, the image will be stretched to it’s actual size, disregarding the size of the cell.
- [height] argument sets the height of the image in pixels. The default value is the height of the original image.
- [width] argument sets the width of the image in pixels. The default value is the width of the original image.
- [mode] argument determines how the image should be scaled and positioned in the cell. The mode can be set to “1” (fit), “2” (fill), or “3” (stretch). The default value is “1”.
- Press Enter to apply the formula to the cell.
- The image should now be displayed within the cell.
Tips and tricks for using the IMAGE function in Google Sheets
- Be mindful of the size of your images: When inserting images into your spreadsheet, it’s important to be mindful of the size of the images. The space taken up by each image within a sheet varies depending on the type of image. The larger the image, the more space, which can make it difficult to work with the data. Try to keep your images small and focused on the data points you want to highlight.
- Use dynamic images: One of the great things about the IMAGE function in Google Sheets is that it allows you to use dynamic images that change based on the data in the sheet. Try using dynamic images to highlight changes in the data over time or to display different images based on different criteria within the spreadsheet.
- Experiment with display modes: The [mode] argument in the IMAGE function allows you to customize the way that the image is displayed within the cell. Try out each mode to find the one that works best for the data you are presenting.
- Use conditional formatting: Conditional formatting can be a powerful tool when working with images in Google Sheets. By using conditional formatting, you can set rules that change the appearance of cells based on the data within them. For example, you could set a rule that changes the color of a cell based on the value within it, or you could set a rule that displays a different image based on certain criteria.
- Consider using add-ons: There are a number of add-ons available for Google Sheets that can make working with images even easier. For example, the Image Extractor add-on can be used to extract images from a Google Sheet and save them to your Google Drive.
- Keep in mind that how Google Sheet handles images is different than Microsoft Excel. While Excel can use files from your computer by directly referencing the path of the image on your hard drive, Google Sheets can’t do that. You can, however, upload images from your computer to use in a cell, or insert one from Google Drive. By doing so, you bypass the image formula, however. Use the menu option Insert > Image > Insert Image In Cell to take advantage of this option.
Conclusion
The IMAGE function in Google Sheets is a powerful tool that can help you to improve the presentation of your data and increase engagement with your information. By inserting images into your spreadsheets, you can improve the visual appeal of your data and make it easier to understand. With its customizable options and flexible nature, the IMAGE function is a great addition to any Google Sheets user’s toolkit. By following the steps outlined in this blog post and keeping the tips and tricks in mind, you’ll be able to create dynamic, engaging spreadsheets that make use of the IMAGE function to its fullest potential.